INDIVIDUAL CIRCUITS
Before we could carry out a test on an Individual Circuit, we had to create the circuit on the circuit board, however, before we could do that, we had to draw a picture of our individual circuit.
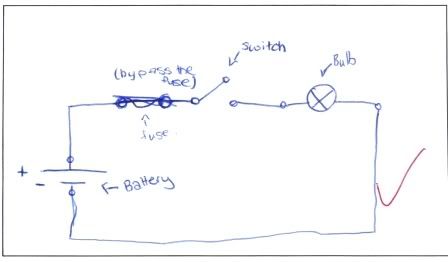
Measuring the Available (Supply) Voltage within the circuit
Positive 12v supply (B+) 13.40v
Terminal before the switch 13.30v
Terminal after the switch 13.16v
Terminal before the light bulb 13.15v
Terminal after the light bulb 0.01v
Negative on the 12v supply (N-) 0.00v
The table above shows the results we found after testing the individual circuit for the availabe voltage. As you can see, when the battery is available to have load it has 13.40v at the Positive supply. The voltage drops however as it passes through each of the different components in the circuit board that use up voltage. Once it reaches the terminal after the light bulb, the voltage drops drastically to 0.01v, and once it reaches the negative supply, it is reading 0.00v.
Measuring Voltage Drop across the circuit components
From B+ 12v supply to input of the switch 0.01v
From input of the switch to output of the switch 0.01v
From output of the switch to input of the bulb 001v
From the input of the bulb to the output of the bulb 12.77v
From the output of the bulb to the N- of the 12v supply 0.01v
The table above shows the results we got after testing the voltage drop in the individual circuit. As you can see, the largest voltage drop came when the volts reached the light bulb, this is because the buld used up almost all of the available voltage, leaving very little left over, however this is not a problem, as the other circuitry does not require a substancial amount of voltage to power the components.
To measure amp's flowing through the individual circuit, we must hook up an amp meter, in series, into the circuit, once this is done, it will give us our reading. We measured it at the wire before the light bulb which gave us the reading of 0.35amps.
Calculating the resistance of the light bulb
To calculate the resistance of the light bulb we must use Ohms Law. Ohms Law to calculate resistance is shown as Volts ÷ Amps = Resistance, or V ÷ I = R.
Using this method, we calculate that: 13.15 ÷ 0.35 = 37.57Ω
This tells us that the resistance in our light bulb is 37.57Ω
Calculating the Watts used at the light bulb
To calculate the Watts used at the light bulb, we must use the Power Law. The Power Law to calculate Watts is shown as Volts x Amps = Watts, or V x I = W.
Using this method, we calculate that: 13.15 x 0.35 = 4.60W
This tells us that the Watts used at the light bulb are 4.60w.
After we had done these calculations, we then had to create another circuit with a larger bulb.
Measuring the amps (current) flowing through the circuit
Current flow through the curcuit 0.76amps
As you can see from the readings of both the larger bulb amperage and the smaller bulb amperage, the circuit with the smallest bulb has the lowest amperage whilst the circuit with the largest bulb has the most amperage due to the fact that it is larger, therefore it has more load.
Calculating the resistance of the light bulb
12.51v ÷ 0.76a = 16.46Ω
The calculations show that the resistance is alot lower in the bigger bulb than it is in the smaller bulb, this is because the bigger bulb has a higher current flow than the smaller bulb.
Calculating the Watts used at the light bulb
12.51v x 0.76a = 9.50W
The Watts reading for the larger bulb is higher because the light needs to be brighter, whereas the smaller bulb has a lower wattage due to the fact that it does not need to be as bright.
SERIES CIRCUIT
Next, we had to design a Series circuit, which is basically two bulbs put together, in a series. Although there is two bulbs, there is still only one path for the electricity to flow through, it must pass through the first bulb and then the second bulb. Again, we had to draw the circuit first, as shown below.
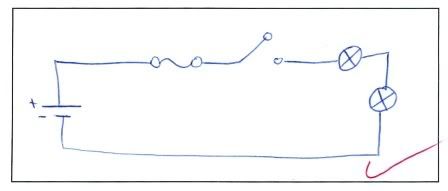
Once we had drawn the wiring diagram, we then moved on to wiring it up on the circuit boards and checking that it worked.
Measuring Voltage Drop across the components
Wire before the switch 0.01v
Switch 0.01v
Wire before light bulb 1 0.01v
Light bulb 1 10.78v
Wire between light bulb 1 & 2 0.01v
Light bulb 2 1.61v
Wire after light bulb 2 0.01v
Measure the voltage available at the battery 12.53v
From this data, we can see that the voltage was a constant 0.01v through-out the circuit until it reached the first light bulb, which then had a voltage drop of 10.78v. The next reading went back down to 0.01v but then when it reached the second bulb it only had 1.61v as the first bulb had used up all the voltage.
Measuring Amps in the circuit
Wire before the switch 0.32a
Wire before light bulb 1 0.32a
Wire between light bulb 1 & 2 0.32a
Wire after light bulb 2 0.32a
As you can see, the amperage in series circuits is different to that of the individual circuits. The amperage in the double bulb circuit has dropped beause of the higher amount of resistance from both bulbs compred to the single bulb circuit.
Calculate the total resistance of the circuit
12.53v ÷ 0.32a = 39.16Ώ
Calculate the Watts used by each light bulb
Bulb 1;
10.78v x 0.32a = 3.44W
Bulb 2;
1.61v x 0.32a = 0.51W
This data tells us that the first bulb has a higher wattage therefore it glows brighter, the second bulb has a lower wattage and does not have enough watts to power the bulb, in addition the resistance is higher in the smaller bulb, which is the first.
After these tests were completed, we proceeded to create a circuit with three bulbs instead of two in series.
Measure voltage drop across the different components
Wire before the switch 0.01v
Switch 0.06v
Wire before light bulb 1 0.01v
Light bulb 1 9.69v
Wire between light bulb 1 & 2 0.01v
Light bulb 2 1.32v
Wire between light bulb 2 & 3 0.0v
Light bulb 3 1.3v
Wire after light bulb 3 0.01v
Measure the voltage available at the supply 12.46v
The data shows that the first bulb has less voltage than the two bulb circuit.The second bulb and third bulb were not that much different than the two bulb circuit readings however they had considerably less voltage than the first bulb.
Measure amps in the circuit
Wire before the switch 0.30a
Wire before light bulb 1 0.30a
Wire between light bulb 1 & 2 0.30a
Wire between light bulb 2 & 3 0.30a
Wire after light bulb 3 0.30a
Compared to the two bulb circuit, the amps have dropped 0.02 amps. The amps in this circuit are continiously stable.
Calculate the total resistance of the circuit
12.46v ÷ 0.30 = 41.53Ω
Calculate the Watts used at each light bulb
Light bulb 1;
9.69v x 0.30a = 2.9W
Light bulb 2;
1.32v x 0.30a = 0.39W
Light bulb 3;
1.3v x 0.30a = 0.39W
These readings show us that these bulbs arent reading high wattage, however the first bulb is still glowing. The circuit takes up quite a bit of the load aswell as the first bulb. On the two bulb circuit it has higher wattage because there is less to use up the load on the circuit.
Use the available voltage method to measure voltage in the circuit
For this test, we started at the positive side of the battery and measured the different parts of the circuit.
Battery positive 13.38v
Input to the switch 13.36v
Output of the switch 13.36v
Supply to light bulb 1 13.36v
Output of light bulb 1 3.19v
Input to light bulb 2 3.23v
Output of light bulb 2 1.8v
Input to light bulb 3 1.86v
Output of light bulb 3 0.21v
At the negative of the supply 0.00v
What do the different readings tell you when using voltage drop compared to available voltage?
Available voltage is measuring how much voltage is available in the circuit at any one component whilst voltage drop is measuring how much voltage drops between each component in the circuit.
Parallel Circuits
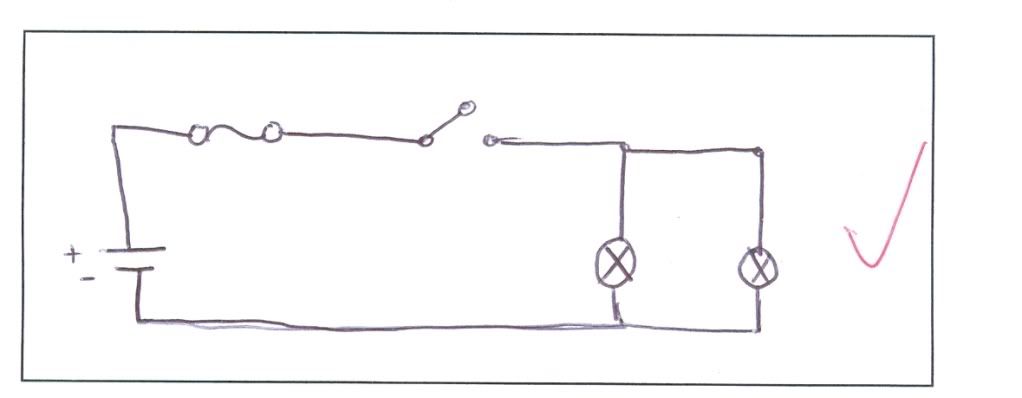
In a parallel circuit each of the consumers have their own B+ supply and N-.
We had to draw a wiring diagram and then create the circuit on our circuit boards, then conduct testing.
Measure available voltage at each light bulb in parallel
Light bulb 1 12.42v
Light bulb 2 12.43v
Measure voltage drop across each light bulb in parallel
Light bulb 1 12.38v
Light bulb 2 12.29v
This data shows that the supply voltage goes from the positive and negative and travels through the bulbs with the same main voltage, making the lights glow, as they now have their own circuit.
Measure the current flow (amps) through the parallel circuit
Current flow through light bulb 1 circuit 0.74a
Current flow through light bulb 2 circuit 0.70a
Total current flow through both circuits 1.44a
The rule applied to parallel circuits is that the current is different, this is different to series circuits as the current stays the same for them. This data backs that up, showing that the current is different compared to the series circuit results.
Calculate the total resistance of each bulb in the circuit
Light bulb 1;
12.38v ÷ 0.74a = 16.73Ω
Light bulb 2;
12.29v ÷ 0.70a = 17.56Ω
Calculate the total resistance of the circuit using the formula given
1/RT = 1 ÷ 16.73 + 1 ÷ 17.56
= 1 + 1.05 ÷ 17.56
= 2.05 ÷ 17.56
RT/1 = 17.56 ÷ 2.05
= 8.57Ω
Calculate total watts used in the parallel circuit whilst both lights are on
Wt = W1 + W2
= 9.16 + 8.60
= 17.76W
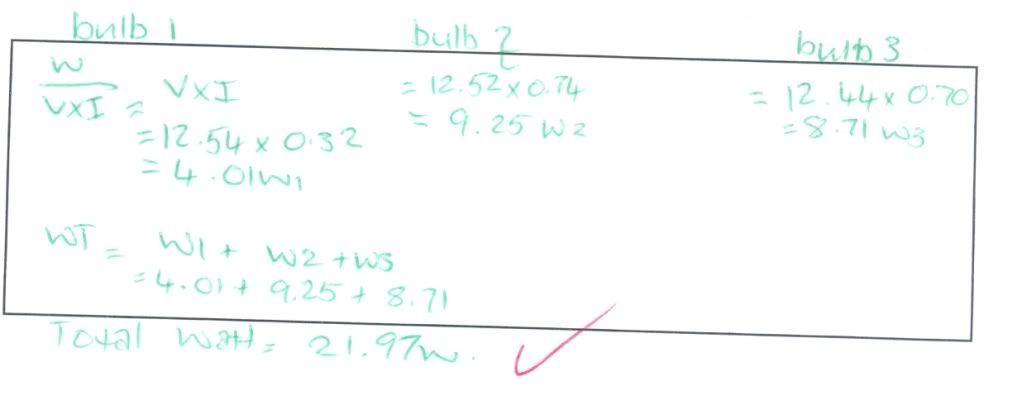
Calculate watts for each individual bulb
Bulb 1;
W = V x I
= 12.38v x 0.74a
= 9.14W
Bulb 2;
W = V x I
= 12.29v x0.70a
= 8.60W
As you can see, these circuits use more wattage than a series circuit would.
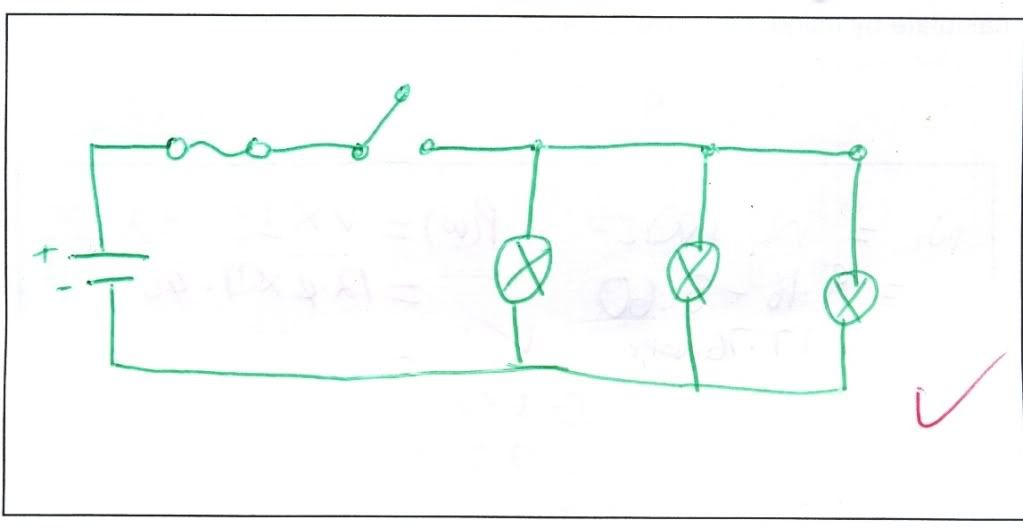
Next we had to draw a wiring diagram for a parallel circuit with three bulbs.
Measure the current (amps) flow through each of the 3 light bulbs circuits
Current flow through light bulb 1 circuit 0.32a
Current flow through light bulb 2 circuit 0.74a
Current flow through light bulb 3 circuit 0.70a
Total current fow through all the circuits 1.76a
As you can see from the results, the first bulb had lower amperage as it was a smaller bulb. The other two bulbs were bigger, therefore they showed a smaller drop in amperage between the two of them. This also illustrates the rule of parallel, which is that the current is always different in the circuit.
Measure available voltage in the circuit now that there are three bulbs
Light bulb 1 12.68v
Light bulb 2 12.75v
Light bulb 3 12.73v
Measure voltage drop across each of the bulbs
Light bulb 1 12.54v
Light bulb 2 12.52v
Light bulb 3 12.45v
Looking at the data on the available voltage in the circuit now that the third bulb has been added, there was no substancial change compared to that of the two bulb circuit. The voltage drop in the circuit now that the third bulb had been added was slightly lower than that of the two bulb circuit.
Calculate the resistance of each bulb
Bulb 1;
R = V ÷ I
= 12.68v ÷ 0.32a
= 39.62Ω
Bulb 2;
R = V ÷ I
= 12.75v ÷ 0.74a
= 17.23Ω
Bulb 3;
R = V ÷ I
= 12.73 ÷ 0.76
= 18.19Ω
Calculate the total resistance of the circuit using the given formula
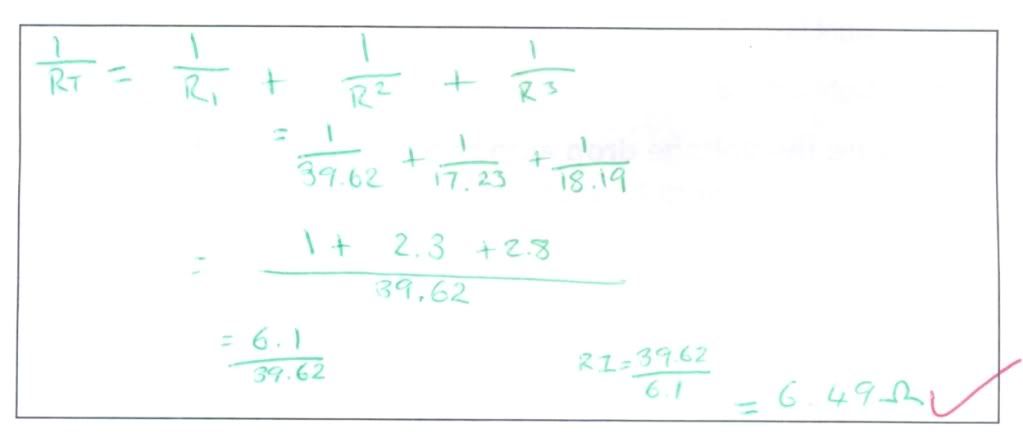
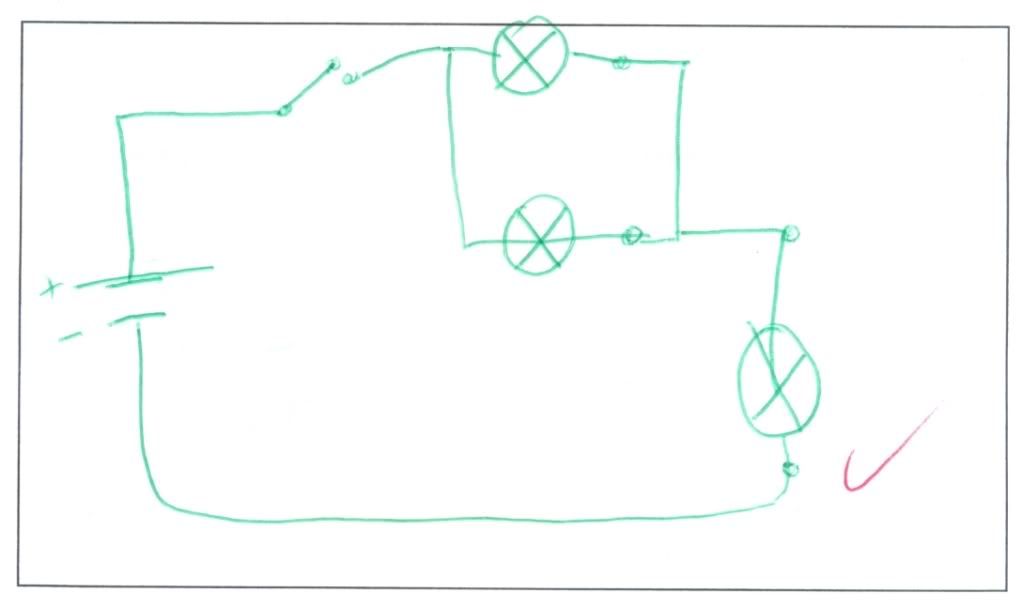
Compound Circuits
Compound circuits are made up of part series and part parallel combinations. Below is a wiring diagram of what a compound circuit may look like.
Measure available voltage at different parts of the compound circuit
Switch 12.61v
Before parallel light bulb 1 12.59v
Before parallel light bulb 2 12.59v
After parallel light bulb 1 8.79v
After parallel light bulb 2 8.78v
Before series light bub 8.77v
After series light bulb 0.08v
Measure the voltage drop at different parts of the compound circuit
Across parallel light bulb 1 3.80 Voltage drop
Across parallel light bulb 2 3.79 Voltage drop
Across series light bulb 8.64 Voltage drop
Measure the current flowing through the circuit at given points
The switch 0.59 amps
Parallel light bulb 1 0.16 amps
Parallel light bulb 2 0.41 amps
Series light bulb 0.59 amps
Calulate watts used at each parallel light bulb
Light bulb 1;
W = V X I
3.80v x 0.16a
= 0.608W
Light bulb 2;
3.79v x 0.41a
= 1.554W
Calculate watts used at the series light bulb
Light bulb 3;
8.64v x 0.59a
= 5.098W
From the calculations, we can see that the bulb in series circuit uses up the most watts, only leaving a small amount for the two bulbs on the parallel circuit. The series bulb also effects the brightness of the bulbs in the parallel circuit because the series bulb is using up the main amount of current flow in the circuit which the parallel bulbs would usually use to power themselves, meaning that the bulbs will be dimmer as there is not enough current flow to support them. As for the amperage, the bulb in the series circuit gets the most current through it, meaning the amperage is higher while the parallel circuit gets the same amount of amperage, however it is shared between the two bulbs. The bulbs on the parallel circuit get an equal amount of voltage but takes away voltage through the voltage drop which then becomes used by the bulb in the series circuit.
No comments:
Post a Comment